

How to Survive a Home Renovation
A home renovation is exciting to dream about. You picture a brand new kitchen, open living spaces, or a cozy master suite that finally feels right. But when the work starts, that dream can turn into chaos. Dust fills the air, furniture crowds the hallway, and suddenly your quiet home becomes a construction zone. Surviving a renovation isn’t just about patience. It’s about preparation and creative problem-solving.
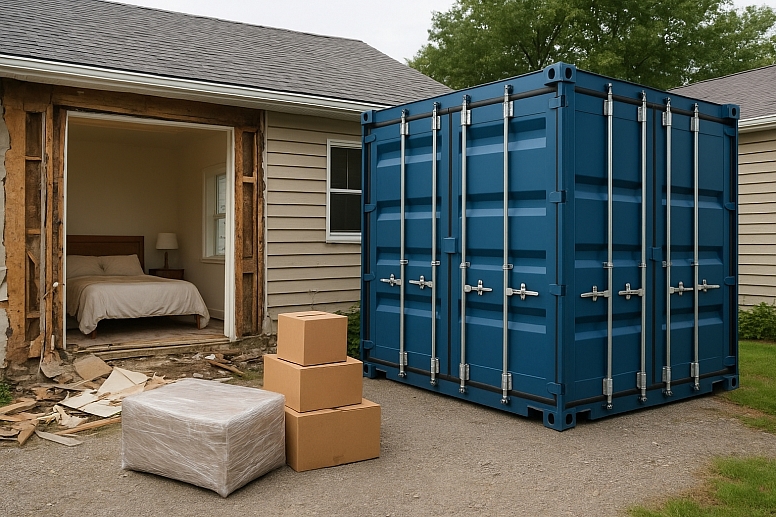
One of the smartest ways to make it easier is to use a shipping container as part of your plan. Whether you rent one for storage or convert it into a temporary living space, it can significantly enhance your renovation experience.
Step 1: Clear the Chaos Before It Starts
Before the first hammer swings, you need to clear space. Contractors need room to move, and your belongings need protection. The last thing you want is sawdust coating your couch or a power tool scratching your dining table. A quick search for shipping containers near me can help alleviate that problem.
Instead of trying to squeeze everything into your garage or a friend’s basement, you can rent a container and have it delivered right to your driveway or yard. These containers are weatherproof, secure, and surprisingly spacious. A standard 20ft container offers about 160 square feet of space. That’s enough for furniture, boxes, and the odds and ends that make up your daily life.
When you pack your belongings into a shipping container, you’re creating a clean divide between your renovation and your routine. Your valuables are safe from dust, water, and accidental damage. You can even organize the container by room or label boxes clearly so you can find things when you need them. It’s like having a mini on-site storage unit that you control.
Keeping your home clear also makes the renovation itself faster and safer. Contractors don’t have to work around clutter, and you don’t have to worry about something breaking in the shuffle.
Step 2: Create a Temporary Living Space That Feels Like Home
If your renovation involves major work like removing walls, replacing floors, or updating plumbing, you might need to step away for a while. Staying in a hotel can get expensive, and moving in with family can be uncomfortable after a few days. A shipping container offers a creative middle ground.
With a few simple modifications, you can turn a container into a temporary living space right on your property. It can be insulated, fitted with power, and even set up with basic plumbing. Think of it as a small but functional apartment that keeps you close to the action. You can stay near your home, check progress daily, and still enjoy privacy and comfort.
Some people turn containers into a tiny home or office during a remodel. Imagine a cozy space with a bed, a small desk, a mini fridge, and a chair by the window. It might not be glamorous, but it keeps your life running smoothly while your house transforms.
If you work from home, a shipping container can also become your temporary office while your main space is under construction. It’s quiet, separate from the mess, and helps you stay productive. When the renovation is over, you can repurpose the container as a workshop, guest suite, or storage space.
Step 3: Rent or Buy. Choose What Works Best for You
One of the best things about using a shipping container during a renovation is flexibility. You don’t have to buy one outright. Finding shipping containers for rent in your area is getting easier every day.
If your renovation will take a few months, renting makes sense. The company delivers the container to your property, places it exactly where you want it, and picks it up when you’re finished. You only pay for the time you need it, and you avoid long-term storage fees or hauling costs.
If you plan to do several projects over the years or want to repurpose the container later, buying one might be a better investment. Containers are durable, long-lasting, and can be modified for endless uses. After your renovation, you could turn yours into a tool shed, art studio, or home gym.
Container sizes vary, but most homeowners choose between a 20ft or 40ft model. The 20ft size works well for most renovations, offering plenty of space without taking up too much yard area. If you have a large home or are storing items from multiple rooms, a 40ft container gives you more flexibility.
Step 4: Keep Your Sanity During the Remodel
Surviving a renovation isn’t just about logistics. It’s about maintaining your sanity while everything feels upside down. Small daily routines can make a big difference.
If you’re living in your home during the renovation, create a small “clean zone” away from the work. Keep essentials like your coffee maker, a few dishes, and personal items in that space. Try to maintain normal routines for meals, exercise, and rest.
If you’ve moved into a container or temporary space, organize it carefully. Keep clothes, toiletries, and daily used items easy to reach. Store less-used items toward the back. Label boxes clearly so you can find what you need without digging through piles.
Communication is also key. Talk regularly with your contractor or project manager about progress and timing. The more you know, the fewer stressful surprises you will have. Ensure your contractor is aware of the location of your container and its contents, particularly if they need to move materials nearby.
And remember to take breaks. Step away from the noise when you can. Go for a walk, visit a friend, or spend time at a quiet café. Renovations can be emotionally draining, so give yourself grace and time to recharge.
Step 5: Turn the End Into a Fresh Start
When the renovation wraps up, resist the urge to rush everything back inside at once. Take this opportunity to declutter before unpacking. The beauty of using a shipping container is that it gives you breathing room to make thoughtful choices about what returns to your home.
Go through boxes one by one and decide what truly belongs in your refreshed space. You might find items you no longer need or things that no longer fit your new design. Donate, sell, or recycle what doesn’t serve you anymore.
If you purchased your container, think about how you can repurpose it. Many homeowners keep theirs as an outdoor storage unit, hobby shop, or garden shed. It’s a reminder that out of renovation chaos, something long-lasting and useful can emerge.
Make the Renovation Work for You
A home renovation doesn’t have to feel like a battle. With smart planning and the right tools, it can be a smooth, even rewarding experience. Shipping containers give you an affordable way to stay organized, protect your belongings, and even create a temporary retreat while the work happens.
You’ll avoid clutter, reduce stress, and keep your home life running smoothly while the dust settles. Whether you rent a container for a few months or invest in one for future projects, it’s a practical solution that helps you survive renovation chaos and come out stronger on the other side.
When the final coat of paint dries and the tools are packed away, you’ll step into your newly renovated home feeling grateful that you had a solid plan from start to finish. And it all started with one simple idea: bringing a shipping container into the process to keep your world organized, safe, and calm while your home transforms.
Categories
Recent Posts

: A Guide for Smarter Architectural Design")


0.0275